
- 1. API with NestJS #1. Controllers, routing and the module structure
- 2. API with NestJS #2. Setting up a PostgreSQL database with TypeORM
- 3. API with NestJS #3. Authenticating users with bcrypt, Passport, JWT, and cookies
- 4. API with NestJS #4. Error handling and data validation
- 5. API with NestJS #5. Serializing the response with interceptors
- 6. API with NestJS #6. Looking into dependency injection and modules
- 7. API with NestJS #7. Creating relationships with Postgres and TypeORM
- 8. API with NestJS #8. Writing unit tests
- 9. API with NestJS #9. Testing services and controllers with integration tests
- 10. API with NestJS #10. Uploading public files to Amazon S3
- 11. API with NestJS #11. Managing private files with Amazon S3
- 12. API with NestJS #12. Introduction to Elasticsearch
- 13. API with NestJS #13. Implementing refresh tokens using JWT
- 14. API with NestJS #14. Improving performance of our Postgres database with indexes
- 15. API with NestJS #15. Defining transactions with PostgreSQL and TypeORM
- 16. API with NestJS #16. Using the array data type with PostgreSQL and TypeORM
- 17. API with NestJS #17. Offset and keyset pagination with PostgreSQL and TypeORM
- 18. API with NestJS #18. Exploring the idea of microservices
- 19. API with NestJS #19. Using RabbitMQ to communicate with microservices
- 20. API with NestJS #20. Communicating with microservices using the gRPC framework
- 21. API with NestJS #21. An introduction to CQRS
- 22. API with NestJS #22. Storing JSON with PostgreSQL and TypeORM
- 23. API with NestJS #23. Implementing in-memory cache to increase the performance
- 24. API with NestJS #24. Cache with Redis. Running the app in a Node.js cluster
- 25. API with NestJS #25. Sending scheduled emails with cron and Nodemailer
- 26. API with NestJS #26. Real-time chat with WebSockets
- 27. API with NestJS #27. Introduction to GraphQL. Queries, mutations, and authentication
- 28. API with NestJS #28. Dealing in the N + 1 problem in GraphQL
- 29. API with NestJS #29. Real-time updates with GraphQL subscriptions
- 30. API with NestJS #30. Scalar types in GraphQL
- 31. API with NestJS #31. Two-factor authentication
- 32. API with NestJS #32. Introduction to Prisma with PostgreSQL
- 33. API with NestJS #33. Managing PostgreSQL relationships with Prisma
- 34. API with NestJS #34. Handling CPU-intensive tasks with queues
- 35. API with NestJS #35. Using server-side sessions instead of JSON Web Tokens
- 36. API with NestJS #36. Introduction to Stripe with React
- 37. API with NestJS #37. Using Stripe to save credit cards for future use
- 38. API with NestJS #38. Setting up recurring payments via subscriptions with Stripe
- 39. API with NestJS #39. Reacting to Stripe events with webhooks
- 40. API with NestJS #40. Confirming the email address
- 41. API with NestJS #41. Verifying phone numbers and sending SMS messages with Twilio
- 42. API with NestJS #42. Authenticating users with Google
- 43. API with NestJS #43. Introduction to MongoDB
- 44. API with NestJS #44. Implementing relationships with MongoDB
- 45. API with NestJS #45. Virtual properties with MongoDB and Mongoose
- 46. API with NestJS #46. Managing transactions with MongoDB and Mongoose
- 47. API with NestJS #47. Implementing pagination with MongoDB and Mongoose
- 48. API with NestJS #48. Definining indexes with MongoDB and Mongoose
- 49. API with NestJS #49. Updating with PUT and PATCH with MongoDB and Mongoose
- 50. API with NestJS #50. Introduction to logging with the built-in logger and TypeORM
- 51. API with NestJS #51. Health checks with Terminus and Datadog
- 52. API with NestJS #52. Generating documentation with Compodoc and JSDoc
- 53. API with NestJS #53. Implementing soft deletes with PostgreSQL and TypeORM
- 54. API with NestJS #54. Storing files inside a PostgreSQL database
- 55. API with NestJS #55. Uploading files to the server
- 56. API with NestJS #56. Authorization with roles and claims
- 57. API with NestJS #57. Composing classes with the mixin pattern
- 58. API with NestJS #58. Using ETag to implement cache and save bandwidth
- 59. API with NestJS #59. Introduction to a monorepo with Lerna and Yarn workspaces
- 60. API with NestJS #60. The OpenAPI specification and Swagger
- 61. API with NestJS #61. Dealing with circular dependencies
- 62. API with NestJS #62. Introduction to MikroORM with PostgreSQL
- 63. API with NestJS #63. Relationships with PostgreSQL and MikroORM
- 64. API with NestJS #64. Transactions with PostgreSQL and MikroORM
- 65. API with NestJS #65. Implementing soft deletes using MikroORM and filters
- 66. API with NestJS #66. Improving PostgreSQL performance with indexes using MikroORM
- 67. API with NestJS #67. Migrating to TypeORM 0.3
- 68. API with NestJS #68. Interacting with the application through REPL
- 69. API with NestJS #69. Database migrations with TypeORM
- 70. API with NestJS #70. Defining dynamic modules
- 71. API with NestJS #71. Introduction to feature flags
- 72. API with NestJS #72. Working with PostgreSQL using raw SQL queries
- 73. API with NestJS #73. One-to-one relationships with raw SQL queries
- 74. API with NestJS #74. Designing many-to-one relationships using raw SQL queries
- 75. API with NestJS #75. Many-to-many relationships using raw SQL queries
- 76. API with NestJS #76. Working with transactions using raw SQL queries
- 77. API with NestJS #77. Offset and keyset pagination with raw SQL queries
- 78. API with NestJS #78. Generating statistics using aggregate functions in raw SQL
- 79. API with NestJS #79. Implementing searching with pattern matching and raw SQL
- 80. API with NestJS #80. Updating entities with PUT and PATCH using raw SQL queries
- 81. API with NestJS #81. Soft deletes with raw SQL queries
- 82. API with NestJS #82. Introduction to indexes with raw SQL queries
- 83. API with NestJS #83. Text search with tsvector and raw SQL
- 84. API with NestJS #84. Implementing filtering using subqueries with raw SQL
- 85. API with NestJS #85. Defining constraints with raw SQL
- 86. API with NestJS #86. Logging with the built-in logger when using raw SQL
- 87. API with NestJS #87. Writing unit tests in a project with raw SQL
- 88. API with NestJS #88. Testing a project with raw SQL using integration tests
- 89. API with NestJS #89. Replacing Express with Fastify
- 90. API with NestJS #90. Using various types of SQL joins
- 91. API with NestJS #91. Dockerizing a NestJS API with Docker Compose
- 92. API with NestJS #92. Increasing the developer experience with Docker Compose
- 93. API with NestJS #93. Deploying a NestJS app with Amazon ECS and RDS
- 94. API with NestJS #94. Deploying multiple instances on AWS with a load balancer
- 95. API with NestJS #95. CI/CD with Amazon ECS and GitHub Actions
- 96. API with NestJS #96. Running unit tests with CI/CD and GitHub Actions
- 97. API with NestJS #97. Introduction to managing logs with Amazon CloudWatch
- 98. API with NestJS #98. Health checks with Terminus and Amazon ECS
- 99. API with NestJS #99. Scaling the number of application instances with Amazon ECS
- 100. API with NestJS #100. The HTTPS protocol with Route 53 and AWS Certificate Manager
- 101. API with NestJS #101. Managing sensitive data using the AWS Secrets Manager
- 102. API with NestJS #102. Writing unit tests with Prisma
- 103. API with NestJS #103. Integration tests with Prisma
- 104. API with NestJS #104. Writing transactions with Prisma
- 105. API with NestJS #105. Implementing soft deletes with Prisma and middleware
- 106. API with NestJS #106. Improving performance through indexes with Prisma
- 107. API with NestJS #107. Offset and keyset pagination with Prisma
- 108. API with NestJS #108. Date and time with Prisma and PostgreSQL
- 109. API with NestJS #109. Arrays with PostgreSQL and Prisma
- 110. API with NestJS #110. Managing JSON data with PostgreSQL and Prisma
- 111. API with NestJS #111. Constraints with PostgreSQL and Prisma
- 112. API with NestJS #112. Serializing the response with Prisma
- 113. API with NestJS #113. Logging with Prisma
- 114. API with NestJS #114. Modifying data using PUT and PATCH methods with Prisma
- 115. API with NestJS #115. Database migrations with Prisma
- 116. API with NestJS #116. REST API versioning
- 117. API with NestJS #117. CORS – Cross-Origin Resource Sharing
- 118. API with NestJS #118. Uploading and streaming videos
- 119. API with NestJS #119. Type-safe SQL queries with Kysely and PostgreSQL
- 120. API with NestJS #120. One-to-one relationships with the Kysely query builder
- 121. API with NestJS #121. Many-to-one relationships with PostgreSQL and Kysely
- 122. API with NestJS #122. Many-to-many relationships with Kysely and PostgreSQL
- 123. API with NestJS #123. SQL transactions with Kysely
- 124. API with NestJS #124. Handling SQL constraints with Kysely
- 125. API with NestJS #125. Offset and keyset pagination with Kysely
- 126. API with NestJS #126. Improving the database performance with indexes and Kysely
- 127. API with NestJS #127. Arrays with PostgreSQL and Kysely
- 128. API with NestJS #128. Managing JSON data with PostgreSQL and Kysely
- 129. API with NestJS #129. Implementing soft deletes with SQL and Kysely
- 130. API with NestJS #130. Avoiding storing sensitive information in API logs
- 131. API with NestJS #131. Unit tests with PostgreSQL and Kysely
- 132. API with NestJS #132. Handling date and time in PostgreSQL with Kysely
- 133. API with NestJS #133. Introducing database normalization with PostgreSQL and Prisma
- 134. API with NestJS #134. Aggregating statistics with PostgreSQL and Prisma
- 135. API with NestJS #135. Referential actions and foreign keys in PostgreSQL with Prisma
- 136. API with NestJS #136. Raw SQL queries with Prisma and PostgreSQL range types
- 137. API with NestJS #137. Recursive relationships with Prisma and PostgreSQL
- 138. API with NestJS #138. Filtering records with Prisma
- 139. API with NestJS #139. Using UUID as primary keys with Prisma and PostgreSQL
- 140. API with NestJS #140. Using multiple PostgreSQL schemas with Prisma
- 141. API with NestJS #141. Getting distinct records with Prisma and PostgreSQL
- 142. API with NestJS #142. A video chat with WebRTC and React
- 143. API with NestJS #143. Optimizing queries with views using PostgreSQL and Kysely
- 144. API with NestJS #144. Creating CLI applications with the Nest Commander
- 145. API with NestJS #145. Securing applications with Helmet
- 146. API with NestJS #146. Polymorphic associations with PostgreSQL and Prisma
- 147. API with NestJS #147. The data types to store money with PostgreSQL and Prisma
- 148. API with NestJS #148. Understanding the injection scopes
- 149. API with NestJS #149. Introduction to the Drizzle ORM with PostgreSQL
- 150. API with NestJS #150. One-to-one relationships with the Drizzle ORM
- 151. API with NestJS #151. Implementing many-to-one relationships with Drizzle ORM
- 152. API with NestJS #152. SQL constraints with the Drizzle ORM
- 153. API with NestJS #153. SQL transactions with the Drizzle ORM
- 154. API with NestJS #154. Many-to-many relationships with Drizzle ORM and PostgreSQL
- 155. API with NestJS #155. Offset and keyset pagination with the Drizzle ORM
- 156. API with NestJS #156. Arrays with PostgreSQL and the Drizzle ORM
- 157. API with NestJS #157. Handling JSON data with PostgreSQL and the Drizzle ORM
- 158. API with NestJS #158. Soft deletes with the Drizzle ORM
- 159. API with NestJS #159. Date and time with PostgreSQL and the Drizzle ORM
- 160. API with NestJS #160. Using views with the Drizzle ORM and PostgreSQL
- 161. API with NestJS #161. Generated columns with the Drizzle ORM and PostgreSQL
- 162. API with NestJS #162. Identity columns with the Drizzle ORM and PostgreSQL
- 163. API with NestJS #163. Full-text search with the Drizzle ORM and PostgreSQL
- 164. API with NestJS #164. Improving the performance with indexes using Drizzle ORM
- 165. API with NestJS #165. Time intervals with the Drizzle ORM and PostgreSQL
- 166. API with NestJS #166. Logging with the Drizzle ORM
- 167. API with NestJS #167. Unit tests with the Drizzle ORM
- 168. API with NestJS #168. Integration tests with the Drizzle ORM
- 169. API with NestJS #169. Unique IDs with UUIDs using Drizzle ORM and PostgreSQL
- 170. API with NestJS #170. Polymorphic associations with PostgreSQL and Drizzle ORM
- 171. API with NestJS #171. Recursive relationships with Drizzle ORM and PostgreSQL
- 172. API with NestJS #172. Database normalization with Drizzle ORM and PostgreSQL
- 173. API with NestJS #173. Storing money with Drizzle ORM and PostgreSQL
- 174. API with NestJS #174. Multiple PostgreSQL schemas with Drizzle ORM
- 175. API with NestJS #175. PUT and PATCH requests with PostgreSQL and Drizzle ORM
- 176. API with NestJS #176. Database migrations with the Drizzle ORM
- 177. API with NestJS #177. Response serialization with the Drizzle ORM
- 178. API with NestJS #178. Storing files inside of a PostgreSQL database with Drizzle
- 179. API with NestJS #179. Pattern matching search with Drizzle ORM and PostgreSQL
- 180. API with NestJS #180. Organizing Drizzle ORM schema with PostgreSQL
- 181. API with NestJS #181. Prepared statements in PostgreSQL with Drizzle ORM
- 182. API with NestJS #182. Storing coordinates in PostgreSQL with Drizzle ORM
- 183. API with NestJS #183. Distance and radius in PostgreSQL with Drizzle ORM
- 184. API with NestJS #184. Storing PostGIS Polygons in PostgreSQL with Drizzle ORM
- 185. API with NestJS #185. Operations with PostGIS Polygons in PostgreSQL and Drizzle
- 186. API with NestJS #186. What’s new in Express 5?
- 187. API with NestJS #187. Rate limiting using Throttler
As our system grows, certain queries on our database might fail us in terms of performance. One of the popular ways of dealing with this issue are indexes. This article explores how we can use them both through TypeORM and writing our own Postgres queries.
Introduction to indexes
When we store information on a disk, we do so with blocks of data. When searching through it, we need to scan the entirety of it to find matching entries. Iterating over it from cover to cover does not seem like the most performant approach.
In the second part of this series, we’ve created a table of posts.

One of the most common queries that we might want to run here is to find posts of a particular author.
|
1 |
SELECT * FROM post WHERE "authorId" = 1; |
Unfortunately, this means scanning the entire post table to find matching entries. As our table grows, this is going to take more and more time. We can improve this with the help of indexes.
The job of indexes is to make our queries faster. It requires quite a bit of disk space by holding a copy of the indexed field values and pointing to the record they relate to.
|
1 |
CREATE INDEX post_authorId_index ON post ("authorId"); |
Postgres folds column names that we don’t put in double quotes to lower case. This is why we need to write "authorId" above
We can imagine them as key and value pairs. In our case, the keys would be ids of the authors, and the values would be pointers to the posts. This way, Postgres has a lot easier time finding all of the posts of a certain author.
This information is stored in a separate data structure. Whenever we query the data, Postgres can use it under the hood to increase the speed.
Unfortunately, it takes a noticeable amount of space, and Postgres needs to keep it synchronized. Every time we insert or update the data, Postgres needs to update the indexes too. When thinking about adding indexes, we need to consider the pros and cons.
Indexes could benefit our update queries if they have some search conditions, though.
Types of scans
Please note that the above select query that we perform needs to extract the data because we want to access the posts’ contents. Postgres has a concept of index-only scans when the index contains all information required by a query. For example, when we count the number of posts, we might experience an even greater improvement in speed because Postgres does not need to read our table’s contents.
The type of scan is chosen under the hood by Postgres. We can inspect it using the EXPLAIN command.
|
1 |
EXPLAIN SELECT * FROM post WHERE authorId = 1; |
We can expect one of a few different scans to be applied:
- sequential scan
- sequentially scanning all items of a table
- index scan
- uses indexes to increase the performance of the scan. Accesses the data from the index and uses it to fetch the data from the actual table
- index-only scan
- also uses indexes but only scans the index data structure
- bitmap scan
- a process between an index scan and sequential scan
For a more detailed comparison of various scan methods, check out this article.
Implementing Indexes with TypeORM
So far, in this series, we’ve been using TypeORM. We can use it to generate indexes for certain columns using the @Index() decorator.
|
1 2 3 4 5 6 7 8 9 10 11 12 13 14 15 16 |
import { Entity, ManyToOne, PrimaryGeneratedColumn, Index } from 'typeorm'; import User from '../users/user.entity'; @Entity() class Post { @PrimaryGeneratedColumn() public id: number; // ... @Index() @ManyToOne(() => User, (author: User) => author.posts) public author: User; } export default Post; |
After firing up pgAdmin, we can see that TypeORM generated a name for our index.
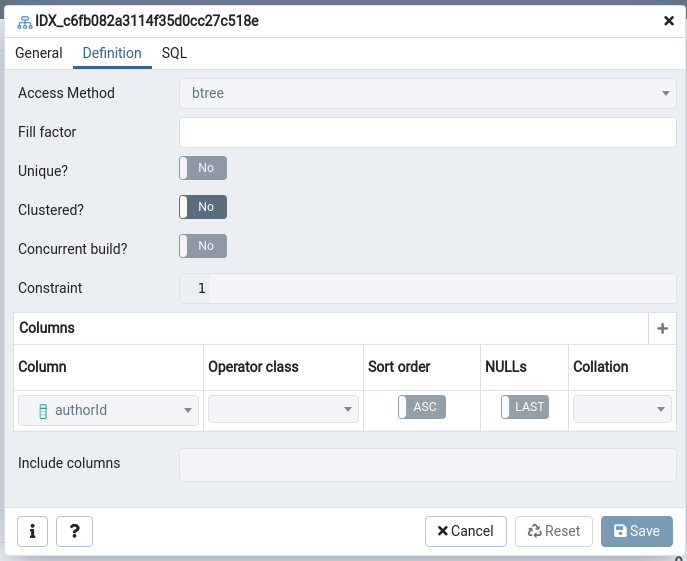
We can avoid the above behavior by providing a name when using the @Index() decorator.
|
1 2 3 4 5 6 7 8 9 10 11 12 13 14 15 16 17 |
import { Entity, ManyToOne, PrimaryGeneratedColumn, Index } from 'typeorm'; import User from '../users/user.entity'; @Entity() class Post { @PrimaryGeneratedColumn() public id: number; // ... @Index('post_authorId_index') @ManyToOne(() => User, (author: User) => author.posts) public author: User; } export default Post; |
Multicolumn indexes
We might sometimes find ourselves making queries with multiple conditions, such as:
|
1 |
SELECT * FROM post WHERE "authorId" = 1 AND "categoryId" = 2 |
The performance of the above might be improved by creating an index that uses two columns.
|
1 |
CREATE INDEX post_authorId_columnId_index ON post ("authorId", "columnId"); |
TypeORM also supports indexes with multiple columns. To specify it, we need to use the @Index() decorator on the entity.
|
1 2 3 4 5 |
@Entity() @Index(['postId', 'authorId']) class Post { // ... } |
Keep in mind that Postgres states in its documentation that multicolumn indexes should be used sparingly. Usually, an index on a single column is enough, and using more than three columns probably won’t be helpful.
Index types
Postgres has a few index types available under the hood. By default, it uses B-tree indexes that fit most cases. We also have a few other options:
- Generalized Inverted Indexes (GIN)
- designed to handle cases where the values contain more than one key – for example, arrays
- Hash indexes
- can only handle simple equality checks
- Block Range Indexes (BRIN)
- used for large tables with columns that have a linear sort order
- Generalized Search Try (GIST)
- useful for indexing geometric data and text search
Unfortunately, TypeORM does not support creating indexes with custom types. If we’d need one of the above types, we would have to write the query ourselves. For example, we could write a migration with it.
Summary
In this article, we’ve looked into the basics of creating indexes in the Postgres database. We’ve also briefly touched on the subject of various index types. To better understand how our database works, we also used the EXPLAIN command to see how effective our indexes are. Since indexes can substantially improve our application’s performance if used currently, they are definitely worth checking out.

When I write a custom migration, eg: create a custom index, … Everything is ok. But when I using typeorm to generate a new migration, it generates a query to drop which are I created custom before. How do you handle it?
Having the same problem. And as a result – creating all the migrations by myself.